📋 Prerequisites
Please complete the Node.js environment setup first and make sure Node.js 18+ is installed correctly.
🎯 Quick Navigation
CodeX is a next-generation intelligent coding assistant built on the GPT-5 architecture, providing developers with outstanding code generation and optimization capabilities.
Deployment path: System environment setup ➜ CLI tool installation ➜ API integration ➜ Development environment ready
🚀 Quick Setup with CC-Switch (Recommended)
⚠️ Prerequisite
Before configuring CodeX with CC-Switch, make sure you have already installed the CodeX tool globally through npm:
npm install -g @openai/codex@latestVerify the installation:
codex --versionWe recommend using the CC-Switch quick configuration tool for graphical setup. It is simple, fast, and does not require manual command-line operations.
Configuration Steps
- Launch CC-Switch and switch to the Codex tab.
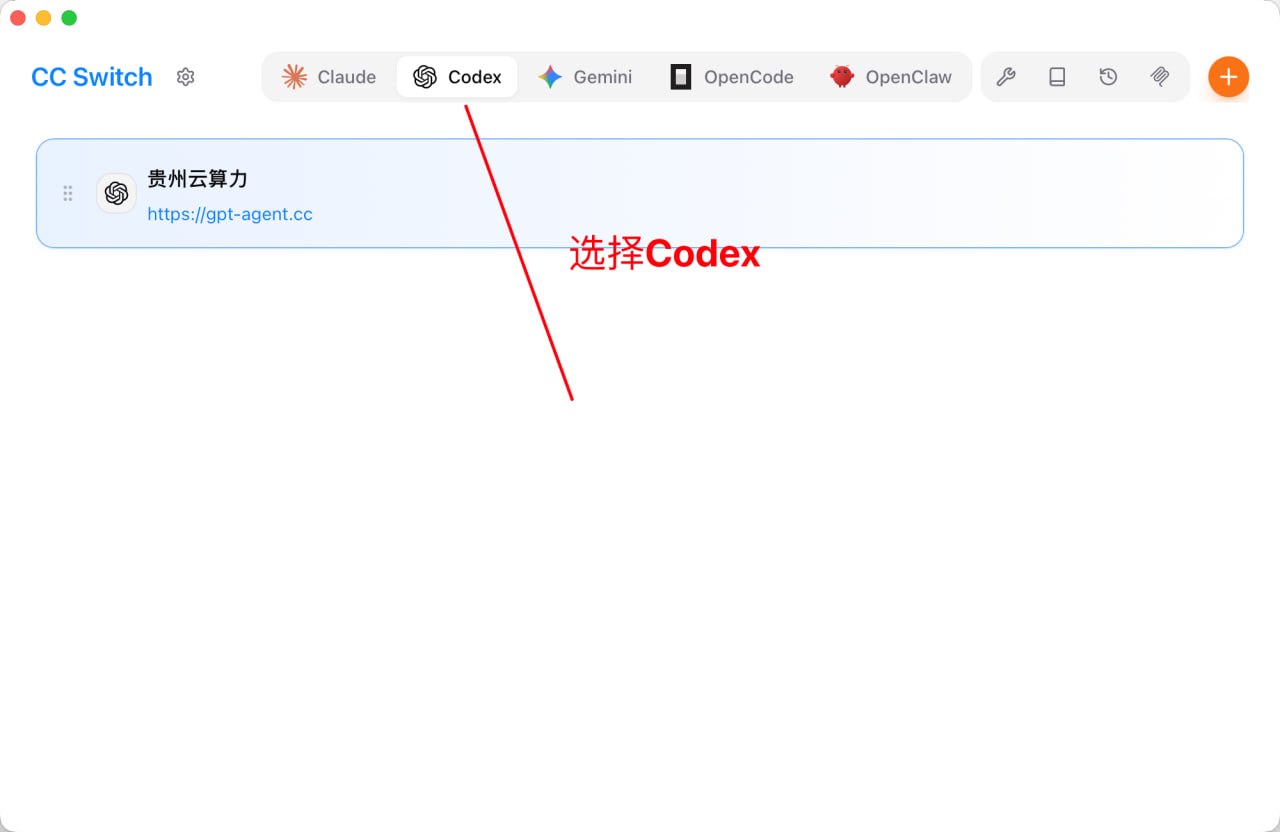
- Open the CC-Switch application.
- Click the Codex tab at the top.
- Click the orange + button in the upper-right corner to add a new configuration.
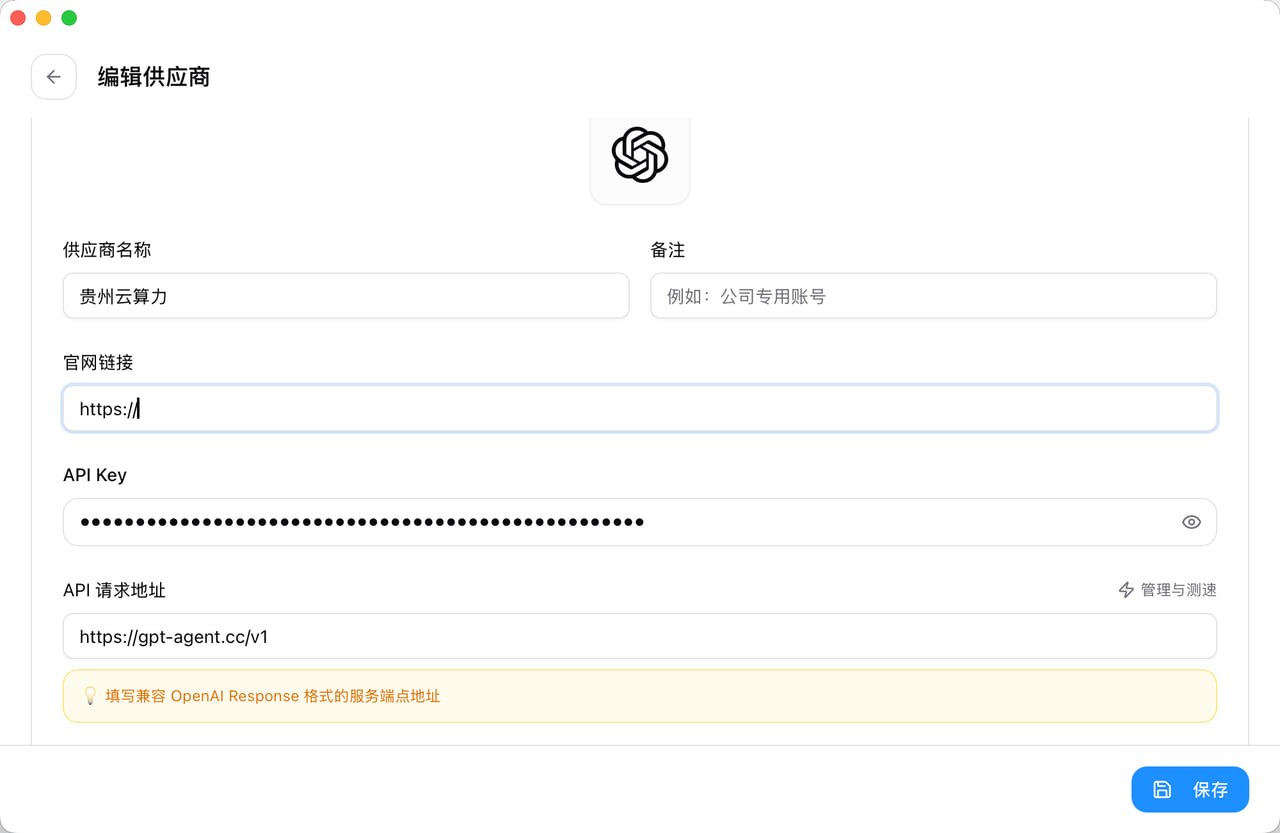
- Fill in the CodeX provider configuration.
- Provider Name: custom name, such as
gpt-agent - Base URL:
https://gpt-agent.cc/v1 - API Key: paste the dedicated CodeX token you received from support (starts with
sk-) - Model: choose
gpt-5.4(latest model at the time this document was written) - Other settings: adjust reasoning level, network access, and other parameters as needed
- Click the Save button.
💡 Tips
- CC-Switch will automatically create
~/.codex/config.tomlandauth.json. - You can add multiple provider configurations and switch between them at any time.
- After switching configurations, close and restart CodeX for the new configuration to take effect.
- Enable the configuration and start using it.
- Find the configuration you just created in the configuration list.
- Click the Currently in Use button on the right side of that configuration.
- The configuration will be marked as Currently in Use (green label).
- Restart CodeX and the new configuration will take effect.
- Quick switching from the system tray.
CC-Switch also supports quick CodeX switching from the system tray:
- Right-click the CC-Switch icon in the system tray
- Select the Codex category from the menu
- Directly choose the configuration you want to switch to
- The configuration takes effect immediately without opening the main window
⚠️ Notes
- Be sure to obtain a dedicated key for the
codextoken group from support. - CodeX tokens are not interchangeable with Claude Code tokens.
- After switching configurations, you need to restart CodeX for the change to take effect.
- You can test the API endpoint speed directly inside CC-Switch.
⌨️ Manual Command-Line Configuration
If you do not use CC-Switch, you can manually configure CodeX by following the steps below.
🖥️ Windows Platform
Step 1: Install the CodeX CLI Tool
Run Command Prompt or PowerShell as Administrator and execute:
npm install -g @openai/codex@latest
codex --version
Step 2: Write the configuration file: config.toml
model_provider = "gpt-agent"
model = "gpt-5.4"
model_reasoning_effort = "xhigh"
disable_response_storage = true
approval_policy = "on-request"
sandbox_mode = "danger-full-access"
model_supports_reasoning_summaries = true

[model_providers.gpt-agent]
name = "ikun"
base_url = "https://api.ikuncode.cc/v1"
wire_api = "responses"
requires_openai_auth = true
Step 3: Write the authentication file: auth.json
{
  "OPENAI_API_KEY": "Paste your dedicated CodeX token here"
}
Step 4: Initialize the workspace
mkdir my-codex-project
cd my-codex-project
codex
🍏 macOS Platform
Install the CodeX Tool
npm install -g @openai/codex@latest
codex --version
Integrate the API Service
Create the configuration directory:
mkdir -p ~/.codex
cd ~/.codex
Write the config.toml configuration:
cat > config.toml << 'EOF'
model_provider = "gpt-agent"
model = "gpt-5.4"
model_reasoning_effort = "xhigh"
disable_response_storage = true
approval_policy = "on-request"
sandbox_mode = "danger-full-access"
model_supports_reasoning_summaries = true

[model_providers.gpt-agent]
name = "ikun"
base_url = "https://api.ikuncode.cc/v1"
wire_api = "responses"
requires_openai_auth = true
EOF
Write the auth.json authentication configuration:
cat > auth.json << 'EOF'
{
  "OPENAI_API_KEY": "Paste your dedicated CodeX token here"
}
EOF
Initialize the workspace
mkdir my-codex-project
cd my-codex-project
codex
🐧 Linux Platform
Install the CodeX Tool
sudo npm install -g @openai/codex@latest
codex --version
Integrate the API Service
Create the configuration directory:
mkdir -p ~/.codex
cd ~/.codex
Write the config.toml configuration:
cat > config.toml << 'EOF'
model_provider = "gpt-agent"
model = "gpt-5.4"
model_reasoning_effort = "xhigh"
disable_response_storage = true
approval_policy = "on-request"
sandbox_mode = "danger-full-access"
model_supports_reasoning_summaries = true

[model_providers.gpt-agent]
name = "ikun"
base_url = "https://api.ikuncode.cc/v1"
wire_api = "responses"
requires_openai_auth = true
EOF
Write the auth.json authentication configuration:
cat > auth.json << 'EOF'
{
  "OPENAI_API_KEY": "Paste your dedicated CodeX token here"
}
EOF
Initialize the workspace
mkdir my-codex-project
cd my-codex-project
codex
Configuration File Location
- Windows:
%USERPROFILE%\.codex\ - macOS / Linux:
~/.codex/